I spent a few hours this week canning applesauce, something I used to do with my brother Rob every year, but I haven't done it since the local grocery store had a special on 48-oz. bottles for $1 each and I bought a shopping cart full. Commercial applesauce can be good, but I still like homemade better, so I decided it was time to fill a shelf again. I was planning on picking up some apples while visiting my parents in Wenatchee, but after calling my dad found he had a tree full of Golden Delicious he had been trying to give away. We picked about 100 pounds, which I figured would get me close to my 40-quart target.
I figured I'd share a brief pictorial description of how I make applesauce. I find it takes about one hour per batch of seven quarts if you have someone who will cut and load the apples while you load the jars for processing. If you are doing it solo, add about 10 to 15 minutes more per batch.
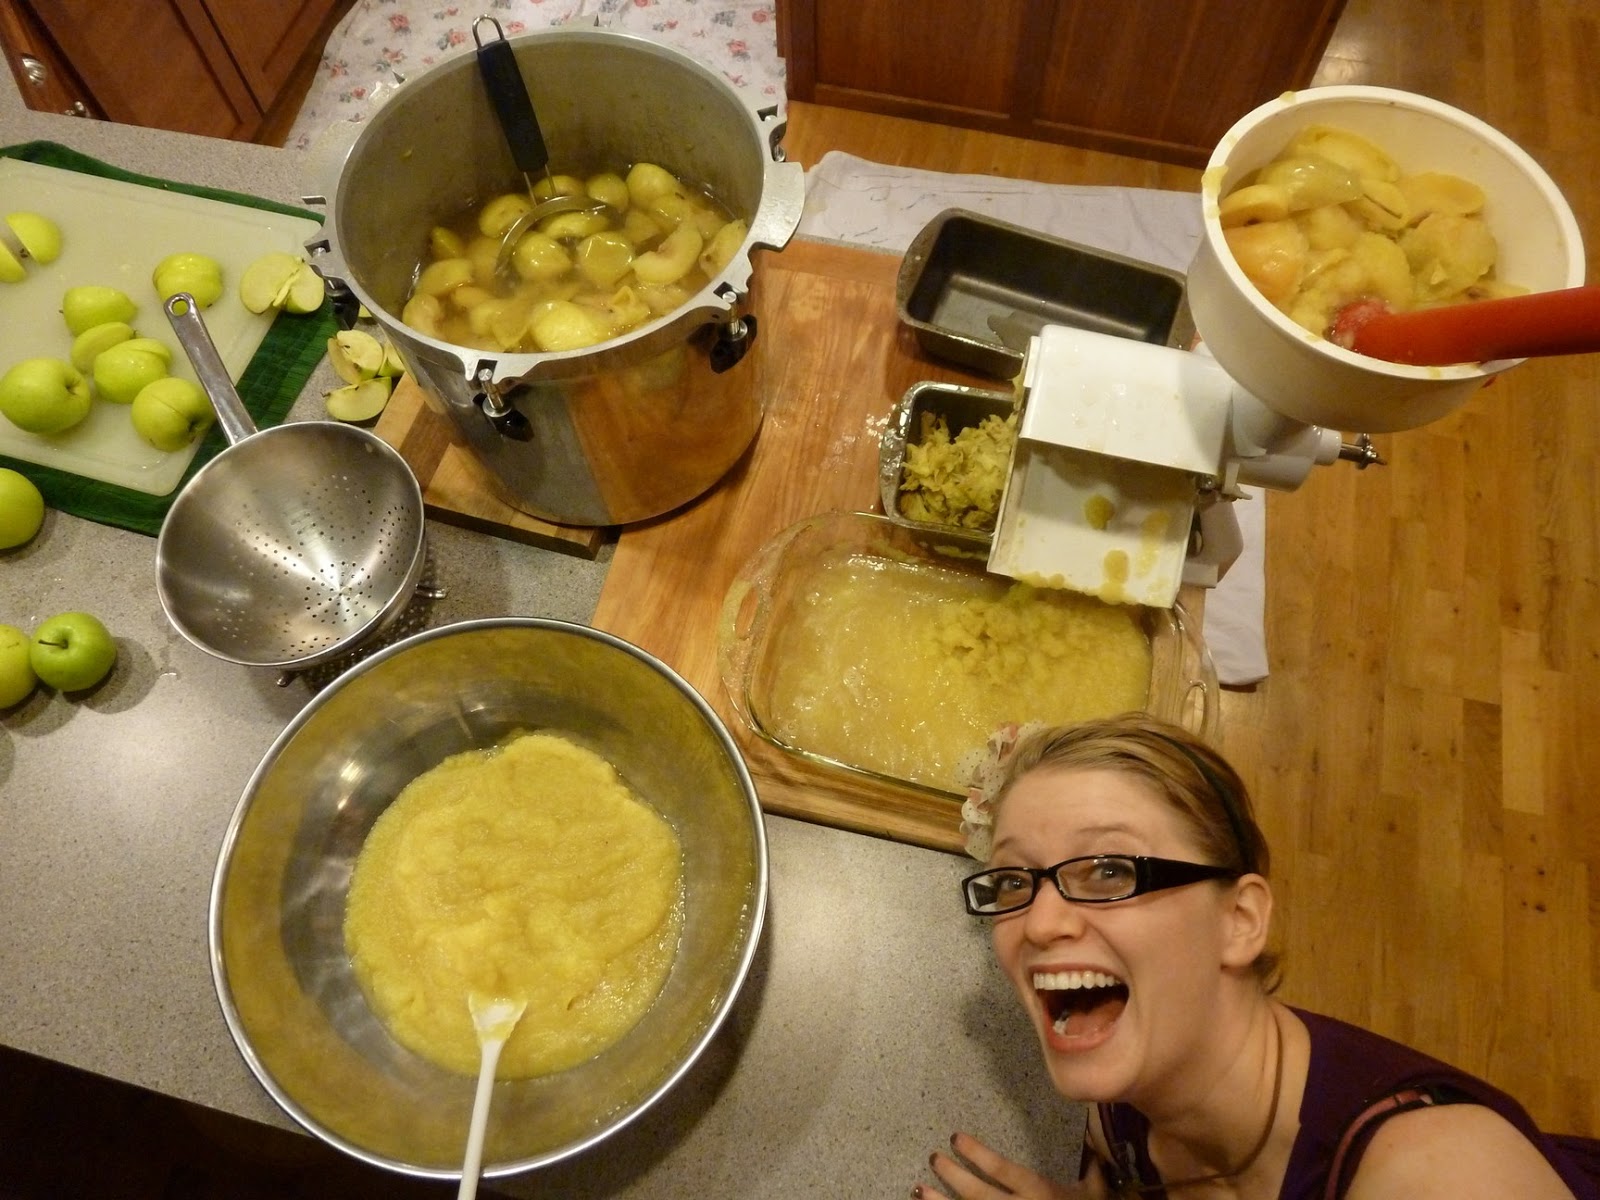
First, equipment.
- Large pot for cooking the apples. I find my pressure canner is the perfect size, cooking enough apples for seven quarts of sauce when it is filled to the top.
- Victorio Food Strainer (or similar device). This thing is great, cranking out seven quarts of sauce in about five minutes, much better than the old handheld strainers.
- A 9" x 13" glass pan for catching the sauce. This fits right under the outlet spout of the Victorio and holds sauce from one hopper full of apples.
- Large stainless steel bowl for accumulating the sauce, should be able to hold seven quarts of applesauce.
- Canner (I use a steam canner rather than the traditional boiling water bath).
- Miscellaneous supplies and tools - cutting board, knife, canning jar funnel, 2 cup glass measuring cup, jars, rags, lids and rings, teapot, etc.
 |
| Tools and supplies for making applesauce |
Get all the equipment together, fill the canner and teapot with water and get them heating. Wash the jars and rings, set the rings and lids in a pan ready to cover with boiling water, yup, all the normal canning stuff.
I start by filling my sink up with apples and cold water, letting them soak for a few minutes to soften any crud on them (a.k.a., bird poop); then with a clean kitchen brush I give them a quick scrub under running water, especially around the stem, and pile them on the counter. Wash enough to fill the pressure canner to the top. Add about 12 cups water to the pressure canner, then quarter the apples and fill the pot all the way to the top. Leave stems, seeds, core, everything else. Just cut out any bad spots.
 |
| Wash and cut in quarters; don't core |
Put the pot on the stove, cover
loosely with the lid, and cook on high until it is steaming a lot, then lower to medium. Cook until the apples are soft. It takes about 50 minutes to an hour for the first batch, then about 35 for 40 minutes for each subsequent batch. While the apples are cooking, wash the apples for the next batch.
 |
| Pressure canner is the perfect size for cooking; don't tighten the lid! |
Remove the pot of apples from the stove and move to the processing area (put it on a wood cutting board if needed to protect the counter. Using a mesh kitchen strainer or colander, scoop the apples out of the pot and into the Victorio strainer hopper. Allow some water to drain as needed to get the consistency of applesauce as you like it. The more water you allow to drain, the thicker your sauce will be.
 |
| The saucing station and someone who really likes applesauce |
It will take about three hopper fillings to sauce the whole batch. After processing a hopper full, dump the 9 x 13 pan into the large stainless steel bowl.
 |
| The Victorio Strainer in action |
 |
| This is all that is lost from seven quarts of applesauce |
With the apples all sauced, now is the time to pour the boiling water over your lids and rings. Then move the bowl of sauce to the area where you will fill and lid the jars. At this time, if you have a helper they can now cut and fill the pot up with apples and get it cooking while you fill the jars. If you are alone, then get the apples cut and cooking before filling the jars.
 |
| The layout for filling and lidding the jars |
Before filling the jars, stir any desired additions into the sauce, like sugar and/or cinnamon. This time I made it all natural to Carlynn's tastes. In the past, I think we did 1 to 1 1/2 cups sugar and 1 tablespoon cinnamon for a seven quart batch. Adjust to taste. This time, I did add a teaspoon of Fruit Fresh to see if it will keep the sauce from darkening.
 |
| In the background you can see how full I fill the jars |
Fill the jars to the bottom of the neck of the jar, wipe the rim with a damp rag, screw the lids on hand tight, place in the canner, and process.
 |
| Putting the lids on |
I set the timer for 37 minutes with the stove on high, and the canner is shooting out the required full jet of steam by time the 30 minutes processing time starts. I process a little more than the time given in my Ball Blue Book because I don't reboil the sauce before packing the jars, and it also works out that the next batch of apples should be ready right after I remove the jars when they process for this length of time.
 |
| Ready to process in the steam canner |
After processing the required time, remove the jars and set aside to cool. Check the next batch of apples; they should be about soft enough to sauce. Repeat the above steps until you run out of apples or time. I did something new this time. Instead of dumping the liquid remaining after the last batch, I poured it through a kitchen mesh stainer and into a pitcher and recovered some really thick cider, an added benefit!
 |
| One evening's work |
In about 4 1/2 hours one evening and 3 hours on Saturday, I put up 38 quarts of applesauce and got about 2 gallons of cider. Now I get to enjoy for the rest of the year.